新方式博客
新方式博客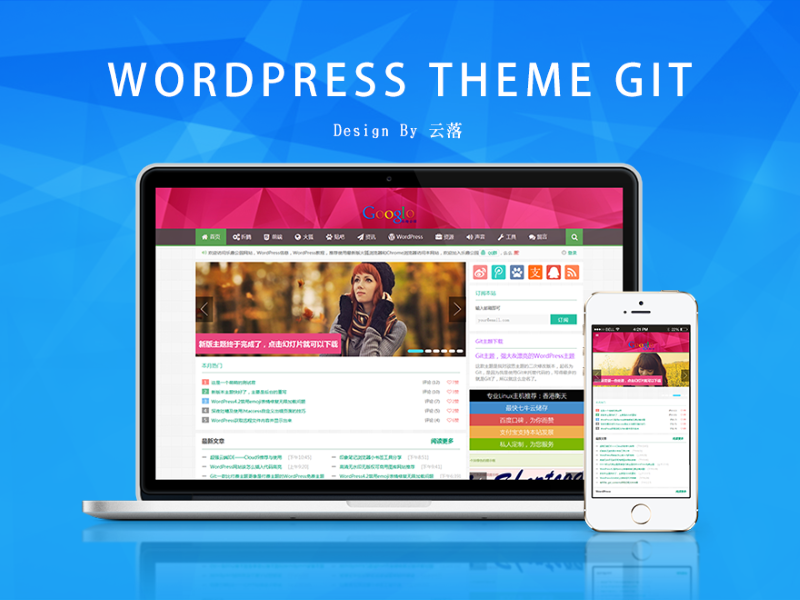
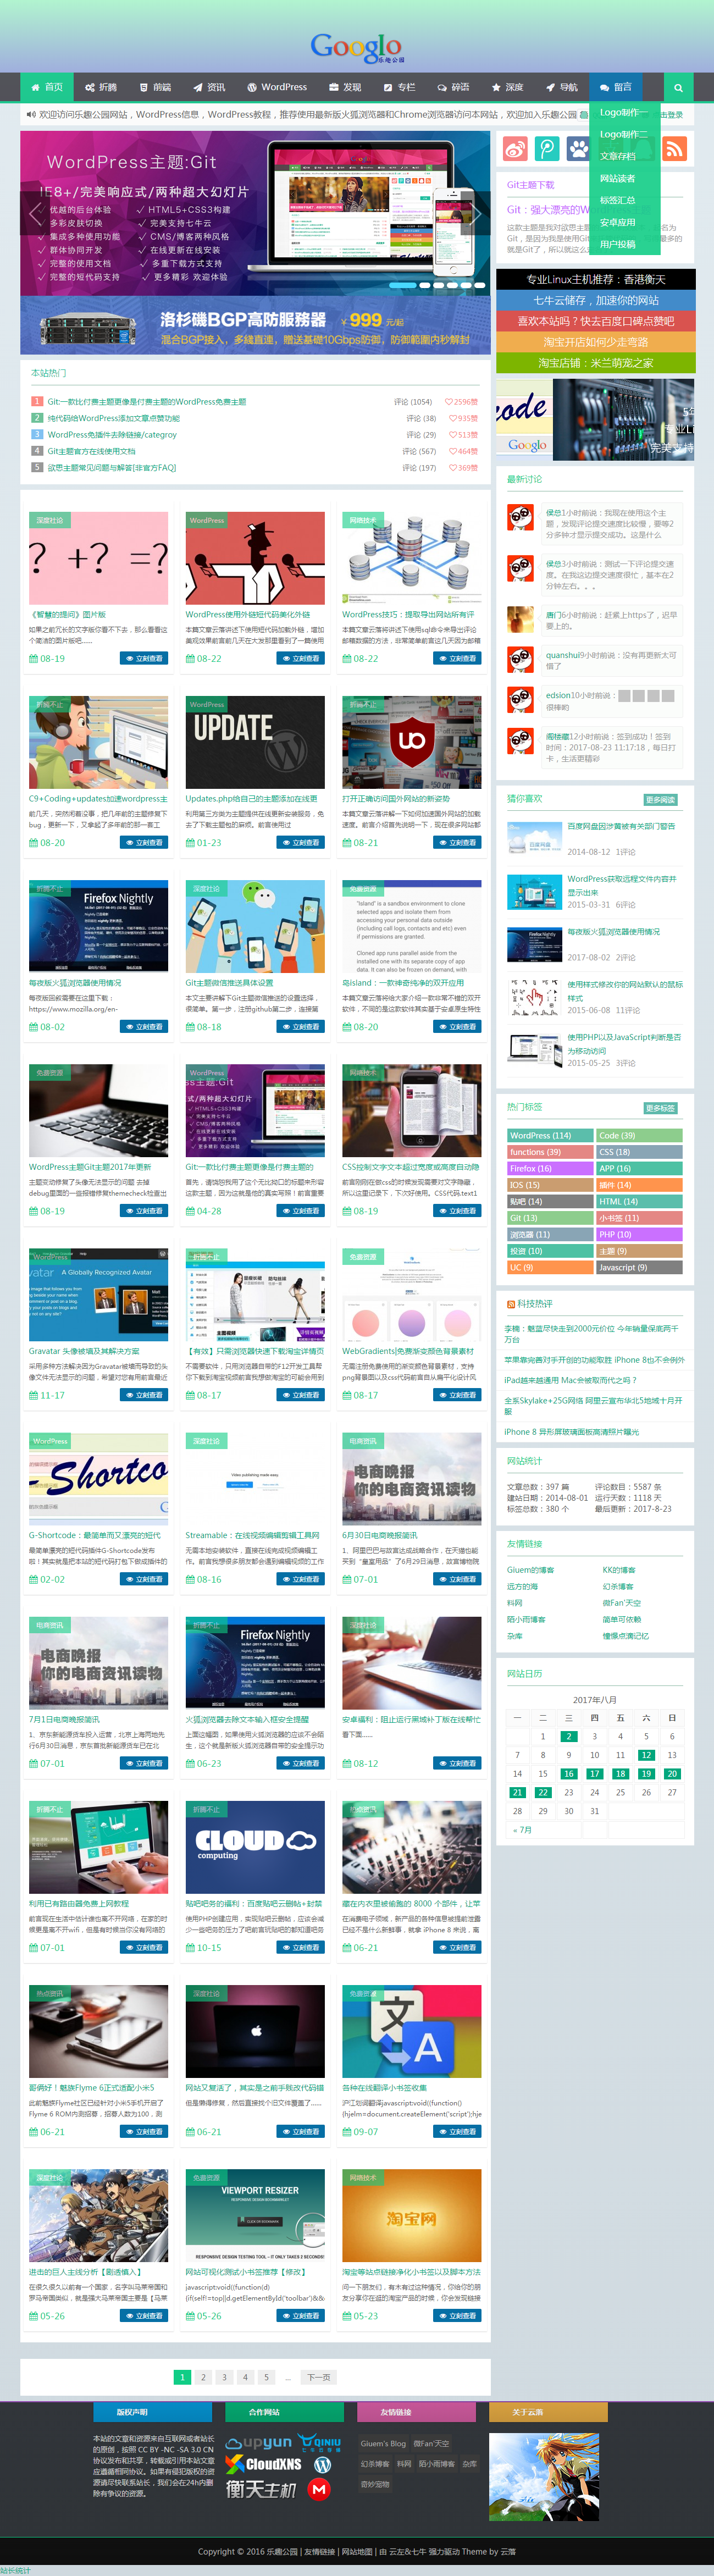
文章标题直接沿用的主题作者的文章标题,单从文章标题咱们就可以看出博主云落对主题的自信水平。作为一款完整免费的WordPress主题,Git非常适宜新人小白停止建站,主题内嵌了许多适用的功用,关于看不懂代码的站长来说,运用这款主题你再也不用为增加某些小功用而死啃代码而苦恼了。但是不幸的是这款主标题前从前中止更新了,不过这也说明主题从前完善到不需求更新了,一款完善且经过很多用户考证过的主题其稳定性自是不会有什么大的问题。下面奉上主题的截图及链接地址,更多细致的内容大家仍是前往主题作者的博客去理解吧,这也算是对云落博主的一点小小的支持。
WordPress 最终完美解决文章 固定链接ID 不连续的问题方案

文章 ID 不连续是很多 “强迫症” 博主的烦恼,尤其是使用了文章 ID 作为固定连接之后,每篇文章的 ID 并不连续,非常不好。
从原因来看,文章 ID 不连续主要是因为自动保存的文章、媒体、页面和其它文章类型占用了 ID 导致的,网上的解决方法一般是强制的禁止自动草稿、不在媒体库上传媒体、不建立页面等等,但这种方法会导致使用上的不便利,而且很有局限性。
解决方案 本文说的方法也是治标不治本,但却能比较好的解决链接上的 ID 不连续这个问题。这个方法就是利用别名,自动给文章设置一个别名,别名按顺序递增,然后把固定连接设置成别名。
批量设置 首先,如果你之前已经有文章了,需要根据顺序重新排列,设置一下别名,从 1 开始递增。
批量设置别名可以把下边的代码添加到 functions.php 里边:
function Bing_post_id_continuous_query(){
set_time_limit( 0 );
remove_action( 'publish_post', 'Bing_post_id_continuous' );
query_posts( 'posts_per_page=-1' );
$arr = array();
while( have_posts() ){
the_post();
$post_id = $GLOBALS['post']->ID;
$arr[] = $post_id;
}
wp_reset_query();
$arr = array_reverse( $arr );
$i = 1;
foreach( $arr as $post_id ){
wp_update_post( array(
'ID' => $post_id,
'post_name' => $i++
) );
}
}
if( $_GET['post_id_continuous_query'] == 'yes' && current_user_can( 'level_10' ) ) add_action( 'init', 'Bing_post_id_continuous_query' );
然后访问下边的地址,注意替换成你的域名(访问时需以管理员身份登录):
http://example.com?post_id_continuous_query=yes
文章多的话网页加载会很慢,耐心等待加载完,加载好后,别名也就批量设置好了。
注意:此代码用完之后不用删除,留着之后有可能还需要用。
新文章自动设置
老文章设置好了,接下来就要给新文章自动设置别名了,
只需要把下边的代码添加到主题的 functions.php 即可:
function Bing_post_id_continuous( $id, $post, $update ){
if( $update || $post->post_status != 'publish' ) return;
$action = 'save_post_post';
$func = 'Bing_post_id_continuous';
remove_action( $action, $func, 10 );
wp_update_post( array(
'ID' => $id,
'post_name' => wp_count_posts()->publish + 1
));
add_action( $action, $func, 10, 3 );
}
add_action( 'save_post_post', 'Bing_post_id_continuous', 10, 3 );
添加好后,每发布一篇文章,别名都会自动设置成当前发布文章的数量加 1.
修改固定链接
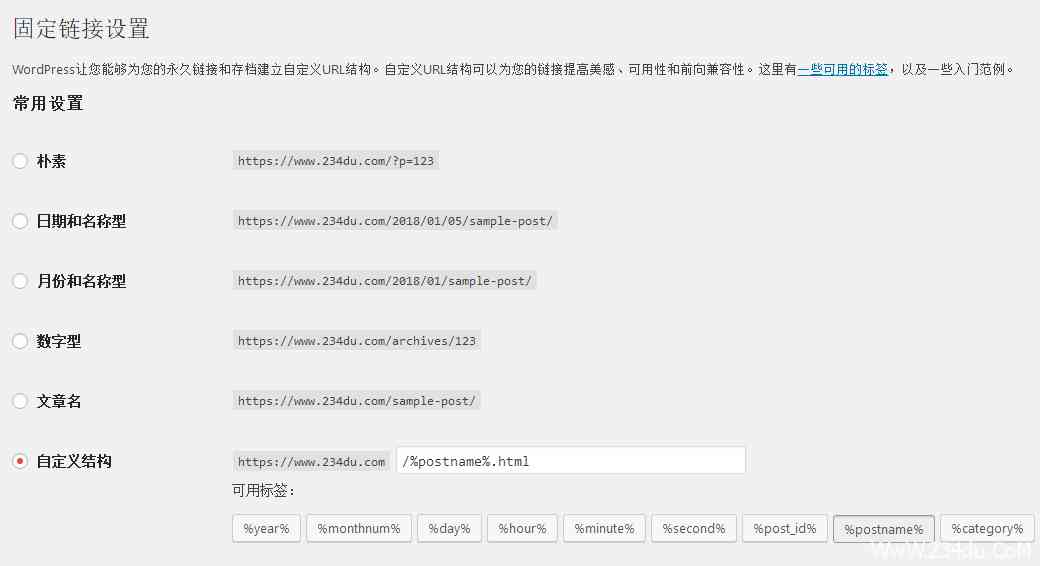
需要在后台的 “设置” → “固定连接” 里设置一下固定连接,代码如下:
/%postname%.html
WordPress G-Shortcode短代码演示
WordPress 一键式全站优化插件:WPJAM-Basic

WPJAM Basic 是我爱水煮鱼博客多年来使用 WordPress 来整理的一键式全站优化插件,WPJAM Basic 主要功能有三个方面:
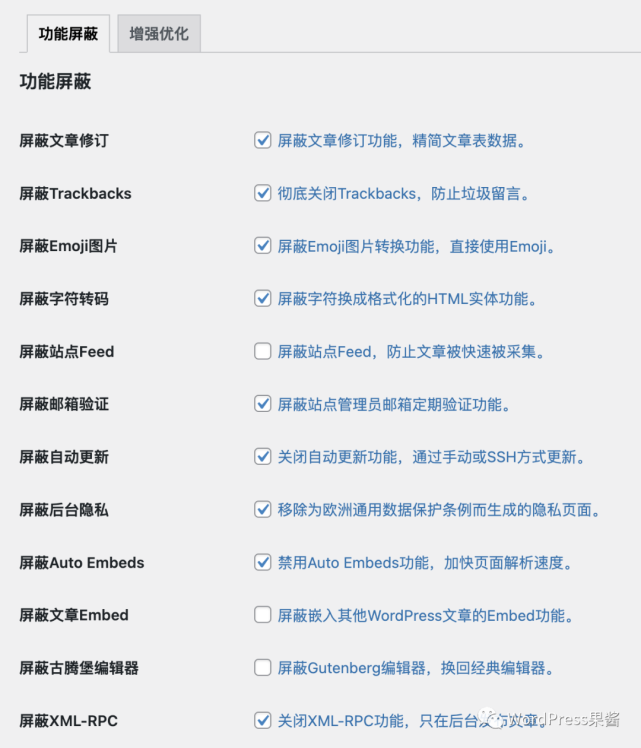
就是去掉 WordPress 当中一些不常用或者影响性能的功能,比如文章修订,Trackbacks等。
还有就是提供一些经常使用的函数,比如获取文章中第一张图,获取文章摘要等。
提供 WordPress 开发基础,目前基于 WPJAM Basic 的免费插件有近10个(公众号「WordPress果酱」回复「免费」获取),以及知识星球福利插件近30个。
如果主机安装了 Memcacached 内存缓存组件和对应的 PHP 扩展,WPJAM Basic 也针对一些常用函数提供了对象缓存的优化。
方法一:
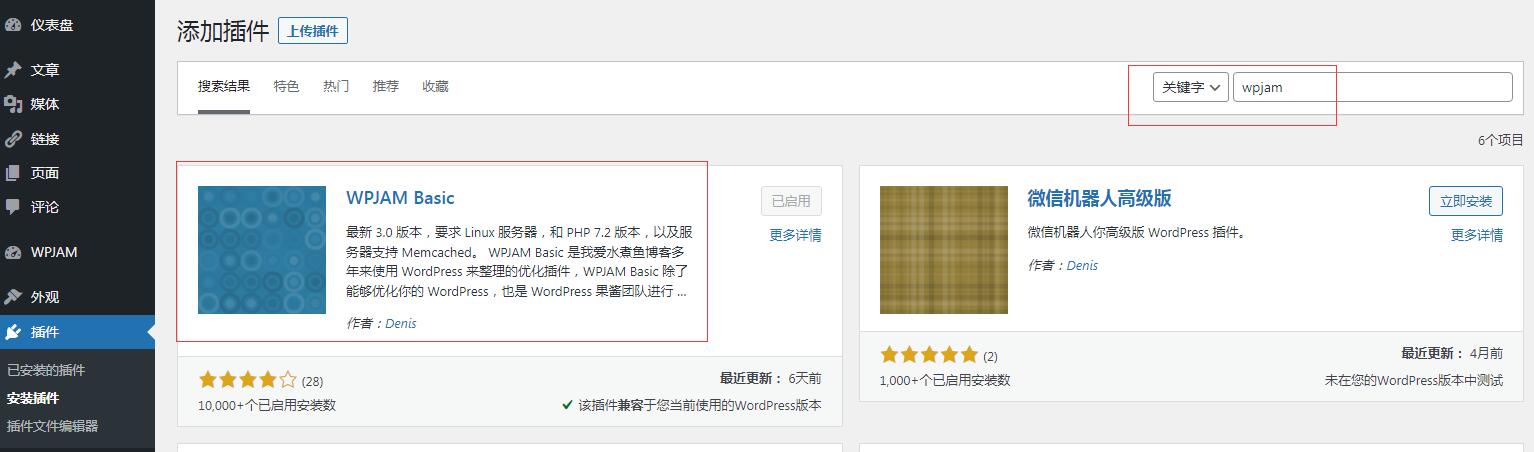
如图:后台-插件-安装插件-搜索 WPJAM Basic
方法二:
下载:WPJAM Basic,上传 wpjam-basic 目录 到 /wp-content/plugins/ 目录。也可以直接在 WordPress 后台安装插件界面直接搜索 WPJAM Basic 然后安装。
推荐安装 Memcached 服务端,和 PHP Memcached 扩展之后,将 wpjam-basic/template/ 目录下的 object-cache.php 文件复制到 wp-content 目录下。
激活插件,开始设置使用。
推荐安装 Memcached 服务端,和 PHP Memcached 扩展之后,将 wpjam-basic/template/ 目录下的 object-cache.php 文件复制到 wp-content 目录下。
激活插件,开始设置使用。
优化设置:
四合一简化 WordPress 个人信息,更符合国人使用习惯
今天缙哥哥想增加个人信息字段,方便管理中医体质档案,可是发现默认情况下,WordPress 后台让用户可以在后台设置:姓,名,昵称,然后选择显示的名称。大概就是下图这个样子:
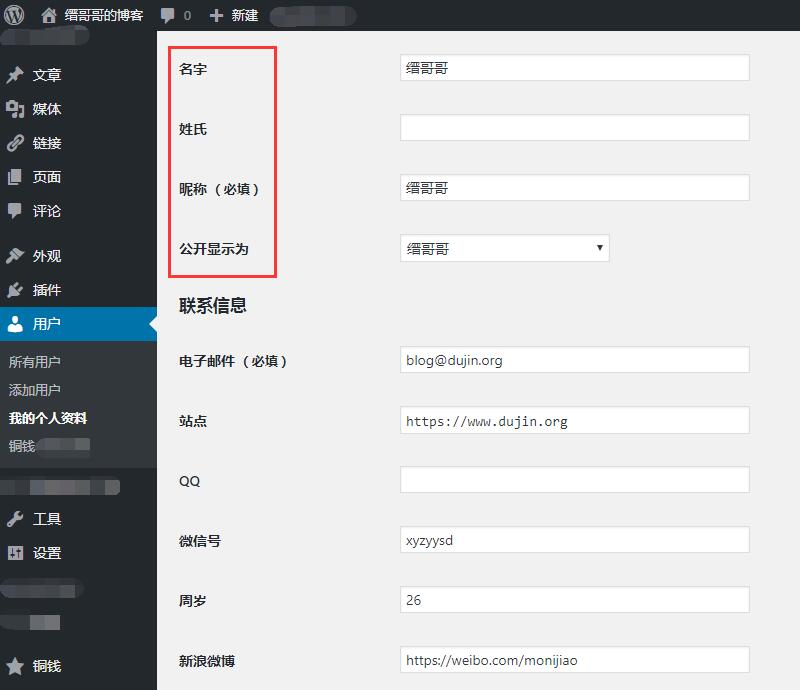
简直神烦有木有?搞的跟个外国佬一样,中国哪那么复杂,顶多也就姓名、昵称、显示三项。后面一想,一般人总不会显示姓名吧,那显示的选项也就没有必要了,为什么不直接留个昵称就好了呢?
其实只是用来写写博客,很少的编辑会填这么多的东西,但是如果删掉的话,又怕某些字段需要引用,所以最好的方法就是把他们隐藏起来,看了一下 WordPress 源代码,名称设置这里竟然没有 filter,没有filter 那就用 JS 来隐藏,然后提交的时候,把显示的名称强制设置为昵称就好了。
最后的代码如下,同样复制到当前主题的 functions.php 文件即可:
/**
* 四合一简化 WordPress 后台用户个人信息姓名昵称设置
* https://www.dujin.org/fenxiang/wp/10138.html
*/
add_action('show_user_profile','wpjam_edit_user_profile');
add_action('edit_user_profile','wpjam_edit_user_profile');
function wpjam_edit_user_profile($user){
	?>
	<script>
        jQuery(document).ready(function($) {
                $('#first_name').parent().parent().hide();
                $('#last_name').parent().parent().hide();
                $('#display_name').parent().parent().hide();
                $('.show-admin-bar').hide();
        });
        </script>
<?php
}

//更新时候,强制设置显示名称为昵称
add_action('personal_options_update','wpjam_edit_user_profile_update');
add_action('edit_user_profile_update','wpjam_edit_user_profile_update');
function wpjam_edit_user_profile_update($user_id){
        if (!current_user_can('edit_user', $user_id))
                  return false;
        $user = get_userdata($user_id);
        $_POST['nickname'] = ($_POST['nickname'])?:$user->user_login;
	$_POST['display_name']	= $_POST['nickname'];
	$_POST['first_name']	= '';
	$_POST['last_name']		= '';
}
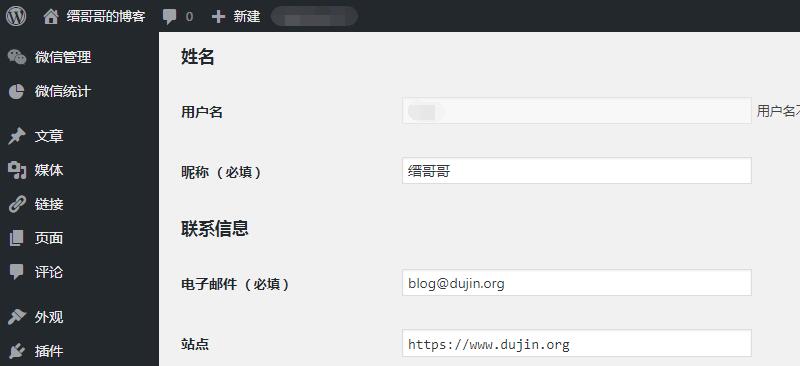
怎么样,是不是好看多了!简洁明了,也不用填写多次了……
WordPress自定义文章作者名称

有时候网站会收到一些投稿文章,或者也会转载别人的文章,新创建一个用户又有些麻烦,但在作者名称那里显示自己的名字,总不是那么和谐。今天倡萌推荐 @西秦公子 的一个小插件,支持在后台自定义当前文章的作者名称,效果如下图所示:
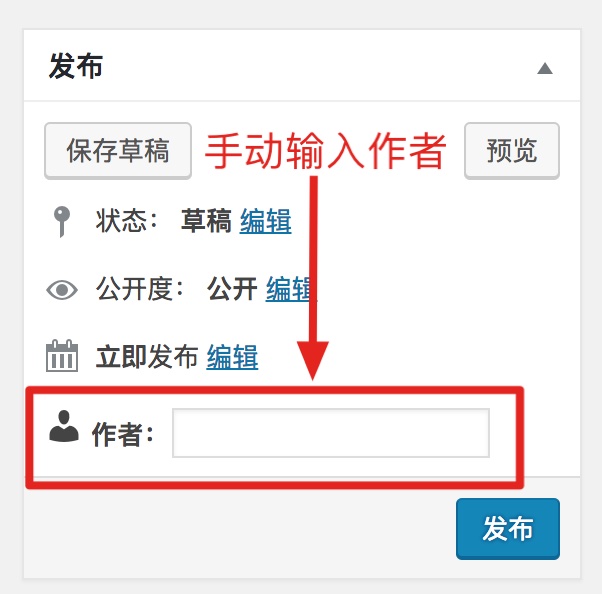
直接在后台插件安装界面搜索“自定义作者名称”即可在线安装,或者到官方下载:https://wordpress.org/plugins/custom-author/
如果转载或投稿文章比较多,倡萌建议单独创建一个专门用于发布这类文章的用户,然后发布的文章的时候,自定义一下作者名称即可。
下面来看看这个小插件的代码:
<?php
/*
Plugin Name: 	Custom Author
Plugin URI: 	https://www.ixiqin.com/2018/06/wordpress-custom-author-plugin/
Description: 	自定义作者插件
Version: 		1.0
Author: 		Bestony
Author URI: 	https://www.ixiqin.com/
License: 		GPL2
License URI:  	https://www.gnu.org/licenses/gpl-2.0.html
 */
/*  Copyright  2018 Bestony (email : xiqingongzi@gmail.com)
This program is free software; you can redistribute it and/or modify
it under the terms of the GNU General Public License as published by
the Free Software Foundation; either version 2 of the License, or
(at your option) any later version.
This program is distributed in the hope that it will be useful,
but WITHOUT ANY WARRANTY; without even the implied warranty of
MERCHANTABILITY or FITNESS FOR A PARTICULAR PURPOSE.  See the
GNU General Public License for more details.
You should have received a copy of the GNU General Public License
along with this program; if not, write to the Free Software
Foundation, Inc., 51 Franklin St, Fifth Floor, Boston, MA  02110-1301  USA
 */


add_action('post_submitbox_misc_actions', 'cus_author_createCustomField');
add_action('save_post', 'cus_author_saveCustomField');
/** 创建一个checkBox */
function cus_author_createCustomField() {
	$post_id = get_the_ID();
	if (get_post_type($post_id) != 'post') {
		return;
	}
	/**
	 * 提取现有的值
	 * @var boolean
	 */
	$value = get_post_meta($post_id, '_custom_author_name', true);
	/**
	 * 添加 nonce 安全处理
	 */
	wp_nonce_field('custom_author_nonce' , 'custom_author_nonce');
	?>
    <div class="misc-pub-section misc-pub-section-last dashicons-before dashicons-admin-users">
        <label><b>作者:</b><input type="text" value="<?php echo $value ?>" name="_custom_author_name" /></label>
    </div>
    <?php
}
/**
 * 保存配置信息
 * @param  int $post_id 文章的ID
 */
function cus_author_saveCustomField($post_id) {
	/**
	 * 自动保存不处理
	 */
	if (defined('DOING_AUTOSAVE') && DOING_AUTOSAVE) {
		return;
	}
	/**
	 * nonce 信息不正确不处理
	 */
	if (
		!isset($_POST['custom_author_nonce']) ||
		!wp_verify_nonce($_POST['custom_author_nonce'], 'custom_author_nonce')
	) {
		return;
	}
	/**
	 * 用户无权编辑文章不处理
	 */
	if (!current_user_can('edit_post', $post_id)) {
		return;
	}
	/**
	 * 存在此项目就更新
	 */
	if (isset($_POST['_custom_author_name'])) {
		update_post_meta($post_id, '_custom_author_name', sanitize_text_field($_POST['_custom_author_name']));
	} else {
		/**
		 * 不存在就删除
		 */
		delete_post_meta($post_id, '_custom_author_name');
	}
}

add_filter('the_author','cus_author_the_author');
function cus_author_the_author($author){
    $custom_author = get_post_meta(get_the_ID(), '_custom_author_name');
    if ($custom_author) {
		return $custom_author[0];
	} else {
		return $author;
	}
}
核心思路就是通过钩子 the_author 来修改了文章作者的显示名称。
限定了文章类型为 post(文章),见32行。