看到很多博客都在用这个美化框,感觉不错,也用来试试,这里说的是纯代码版,用插件 G-Shortcode 也是可以实现同样的功能的,只不过本人有个习惯就是能不用插件就不用,因为插件使用太多托累网站速度。
h2
绿色通知
红色警告
黄色错误
灰色提示
蓝色提示
蓝边文本
橙色文本
青色文本
粉色文本
下载按钮
蓝色按钮
WPJAM Basic 是我爱水煮鱼博客多年来使用 WordPress 来整理的一键式全站优化插件,WPJAM Basic 主要功能有三个方面:
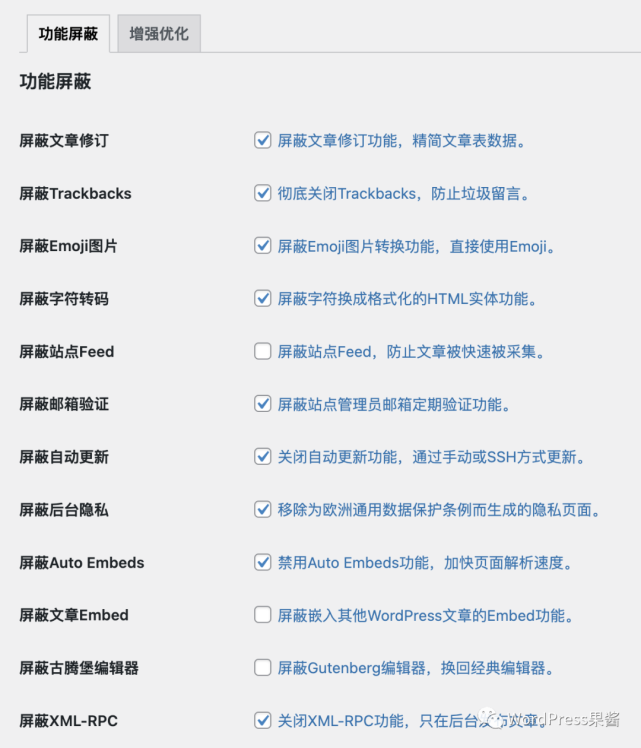
就是去掉 WordPress 当中一些不常用或者影响性能的功能,比如文章修订,Trackbacks等。
还有就是提供一些经常使用的函数,比如获取文章中第一张图,获取文章摘要等。
提供 WordPress 开发基础,目前基于 WPJAM Basic 的免费插件有近10个(公众号「WordPress果酱」回复「免费」获取),以及知识星球福利插件近30个。
如果主机安装了 Memcacached 内存缓存组件和对应的 PHP 扩展,WPJAM Basic 也针对一些常用函数提供了对象缓存的优化。
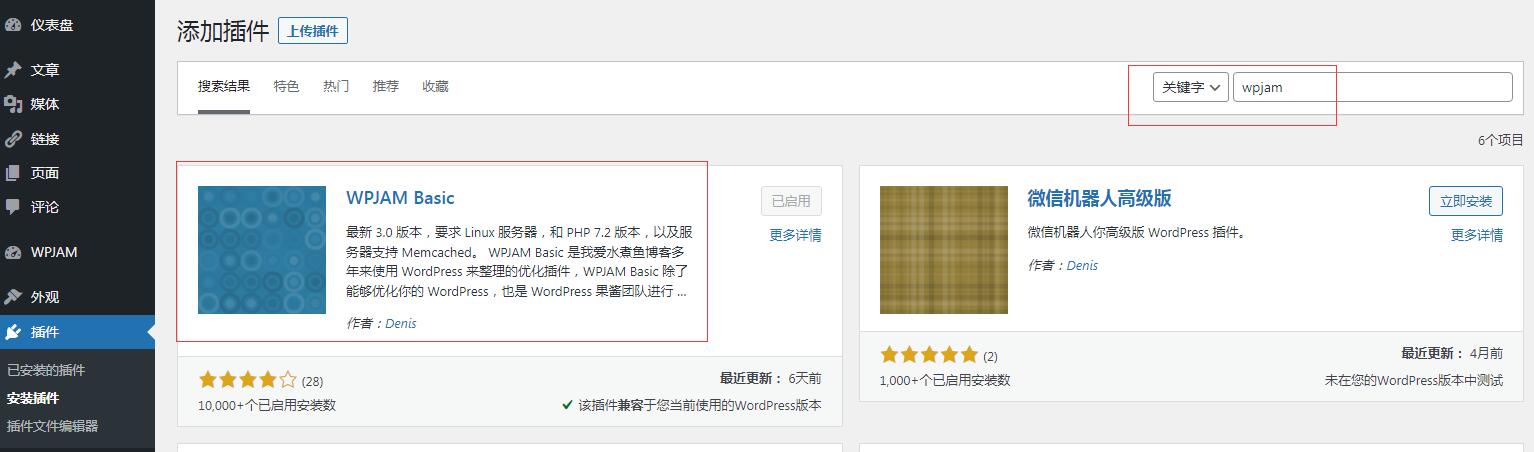
如图:后台-插件-安装插件-搜索 WPJAM Basic
优化设置:
今天缙哥哥想增加个人信息字段,方便管理中医体质档案,可是发现默认情况下,WordPress 后台让用户可以在后台设置:姓,名,昵称,然后选择显示的名称。大概就是下图这个样子:
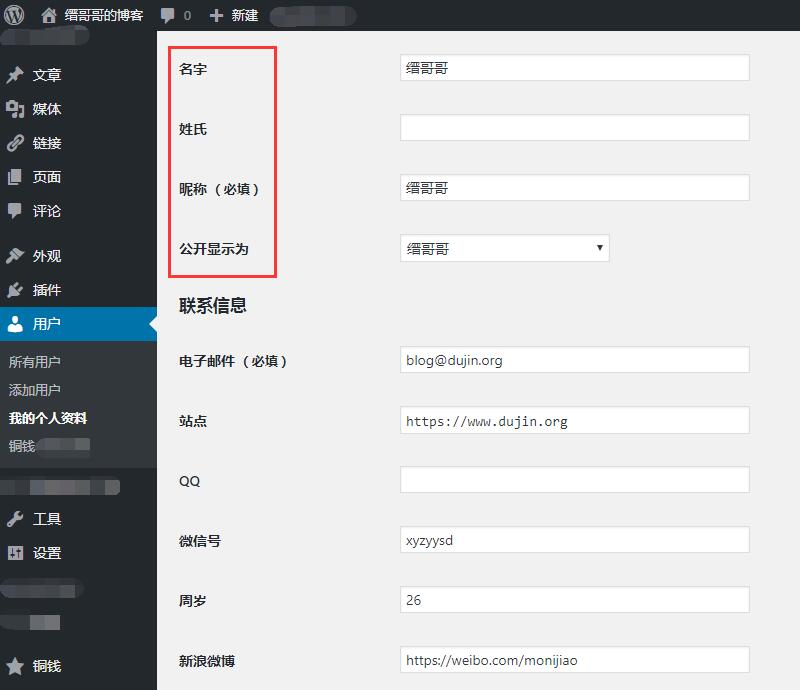
简直神烦有木有?搞的跟个外国佬一样,中国哪那么复杂,顶多也就姓名、昵称、显示三项。后面一想,一般人总不会显示姓名吧,那显示的选项也就没有必要了,为什么不直接留个昵称就好了呢?
其实只是用来写写博客,很少的编辑会填这么多的东西,但是如果删掉的话,又怕某些字段需要引用,所以最好的方法就是把他们隐藏起来,看了一下 WordPress 源代码,名称设置这里竟然没有 filter,没有filter 那就用 JS 来隐藏,然后提交的时候,把显示的名称强制设置为昵称就好了。
/**
* 四合一简化 WordPress 后台用户个人信息姓名昵称设置
* https://www.dujin.org/fenxiang/wp/10138.html
*/
add_action('show_user_profile','wpjam_edit_user_profile');
add_action('edit_user_profile','wpjam_edit_user_profile');
function wpjam_edit_user_profile($user){
	?>
	<script>
        jQuery(document).ready(function($) {
                $('#first_name').parent().parent().hide();
                $('#last_name').parent().parent().hide();
                $('#display_name').parent().parent().hide();
                $('.show-admin-bar').hide();
        });
        </script>
<?php
}

//更新时候,强制设置显示名称为昵称
add_action('personal_options_update','wpjam_edit_user_profile_update');
add_action('edit_user_profile_update','wpjam_edit_user_profile_update');
function wpjam_edit_user_profile_update($user_id){
        if (!current_user_can('edit_user', $user_id))
                  return false;
        $user = get_userdata($user_id);
        $_POST['nickname'] = ($_POST['nickname'])?:$user->user_login;
	$_POST['display_name']	= $_POST['nickname'];
	$_POST['first_name']	= '';
	$_POST['last_name']		= '';
}
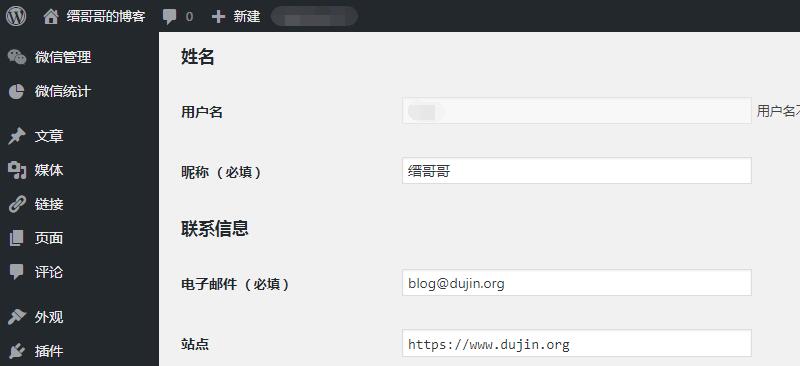
怎么样,是不是好看多了!简洁明了,也不用填写多次了……
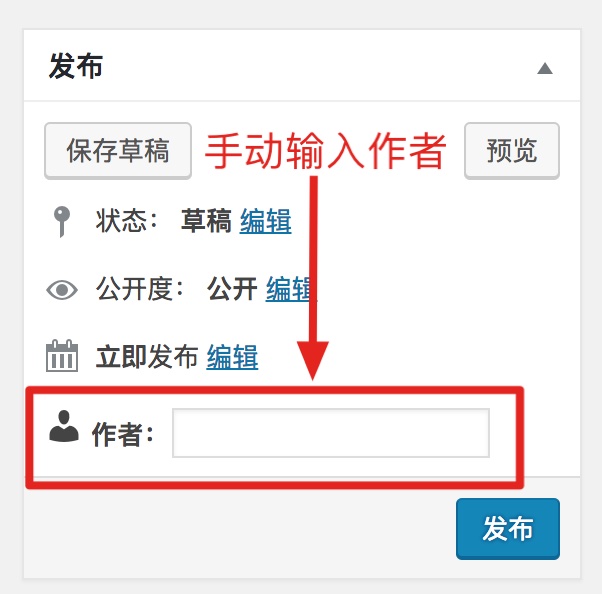
有时候网站会收到一些投稿文章,或者也会转载别人的文章,新创建一个用户又有些麻烦,但在作者名称那里显示自己的名字,总不是那么和谐。今天倡萌推荐 @西秦公子 的一个小插件,支持在后台自定义当前文章的作者名称,效果如下图所示:
直接在后台插件安装界面搜索“自定义作者名称”即可在线安装,或者到官方下载:https://wordpress.org/plugins/custom-author/
如果转载或投稿文章比较多,倡萌建议单独创建一个专门用于发布这类文章的用户,然后发布的文章的时候,自定义一下作者名称即可。
<?php
/*
Plugin Name: 	Custom Author
Plugin URI: 	https://www.ixiqin.com/2018/06/wordpress-custom-author-plugin/
Description: 	自定义作者插件
Version: 		1.0
Author: 		Bestony
Author URI: 	https://www.ixiqin.com/
License: 		GPL2
License URI:  	https://www.gnu.org/licenses/gpl-2.0.html
 */
/*  Copyright  2018 Bestony (email : xiqingongzi@gmail.com)
This program is free software; you can redistribute it and/or modify
it under the terms of the GNU General Public License as published by
the Free Software Foundation; either version 2 of the License, or
(at your option) any later version.
This program is distributed in the hope that it will be useful,
but WITHOUT ANY WARRANTY; without even the implied warranty of
MERCHANTABILITY or FITNESS FOR A PARTICULAR PURPOSE.  See the
GNU General Public License for more details.
You should have received a copy of the GNU General Public License
along with this program; if not, write to the Free Software
Foundation, Inc., 51 Franklin St, Fifth Floor, Boston, MA  02110-1301  USA
 */


add_action('post_submitbox_misc_actions', 'cus_author_createCustomField');
add_action('save_post', 'cus_author_saveCustomField');
/** 创建一个checkBox */
function cus_author_createCustomField() {
	$post_id = get_the_ID();
	if (get_post_type($post_id) != 'post') {
		return;
	}
	/**
	 * 提取现有的值
	 * @var boolean
	 */
	$value = get_post_meta($post_id, '_custom_author_name', true);
	/**
	 * 添加 nonce 安全处理
	 */
	wp_nonce_field('custom_author_nonce' , 'custom_author_nonce');
	?>
    <div class="misc-pub-section misc-pub-section-last dashicons-before dashicons-admin-users">
        <label><b>作者:</b><input type="text" value="<?php echo $value ?>" name="_custom_author_name" /></label>
    </div>
    <?php
}
/**
 * 保存配置信息
 * @param  int $post_id 文章的ID
 */
function cus_author_saveCustomField($post_id) {
	/**
	 * 自动保存不处理
	 */
	if (defined('DOING_AUTOSAVE') && DOING_AUTOSAVE) {
		return;
	}
	/**
	 * nonce 信息不正确不处理
	 */
	if (
		!isset($_POST['custom_author_nonce']) ||
		!wp_verify_nonce($_POST['custom_author_nonce'], 'custom_author_nonce')
	) {
		return;
	}
	/**
	 * 用户无权编辑文章不处理
	 */
	if (!current_user_can('edit_post', $post_id)) {
		return;
	}
	/**
	 * 存在此项目就更新
	 */
	if (isset($_POST['_custom_author_name'])) {
		update_post_meta($post_id, '_custom_author_name', sanitize_text_field($_POST['_custom_author_name']));
	} else {
		/**
		 * 不存在就删除
		 */
		delete_post_meta($post_id, '_custom_author_name');
	}
}

add_filter('the_author','cus_author_the_author');
function cus_author_the_author($author){
    $custom_author = get_post_meta(get_the_ID(), '_custom_author_name');
    if ($custom_author) {
		return $custom_author[0];
	} else {
		return $author;
	}
}
核心思路就是通过钩子 the_author 来修改了文章作者的显示名称。
限定了文章类型为 post(文章),见32行。

WordPress 5.9 版本开始,在WordPress默认的登录界面新增了一个语言切换器选项, 允许用户选择自己要使用的语言登录和使用后台。如下图所示,更多介绍请看之前的文章《WordPres 5.9 的登录屏幕新增语言切换器》
add_filter( 'login_display_language_dropdown', '__return_false' );
好了,就是这么简单!

之前也写过ID不连续的方法,写的比较全面,甚至说到了造成不连续的原因。
有兴趣可以看看。
我就直接把里面的关键方法发布出来吧。
二、添加以下代码;
// WordPress文章ID不连续解决方法
function keep_id_continuous(){
  global $wpdb;
  // 删掉自动草稿和修订版
  $wpdb->query("DELETE FROM `$wpdb->posts` WHERE `post_status` = 'auto-draft' OR `post_type` = 'revision'");
  // 自增值小于现有最大ID,MySQL会自动设置正确的自增值
  $wpdb->query("ALTER TABLE `$wpdb->posts` AUTO_INCREMENT = 1");
}
add_filter( 'load-post-new.php', 'keep_id_continuous' );
add_filter( 'load-media-new.php', 'keep_id_continuous' );
add_filter( 'load-nav-menus.php', 'keep_id_continuous' );
使用说明
建议配合WP clean UP插件清理数据库,效果更佳
注意:新建页面、新建分类依然会占用ID