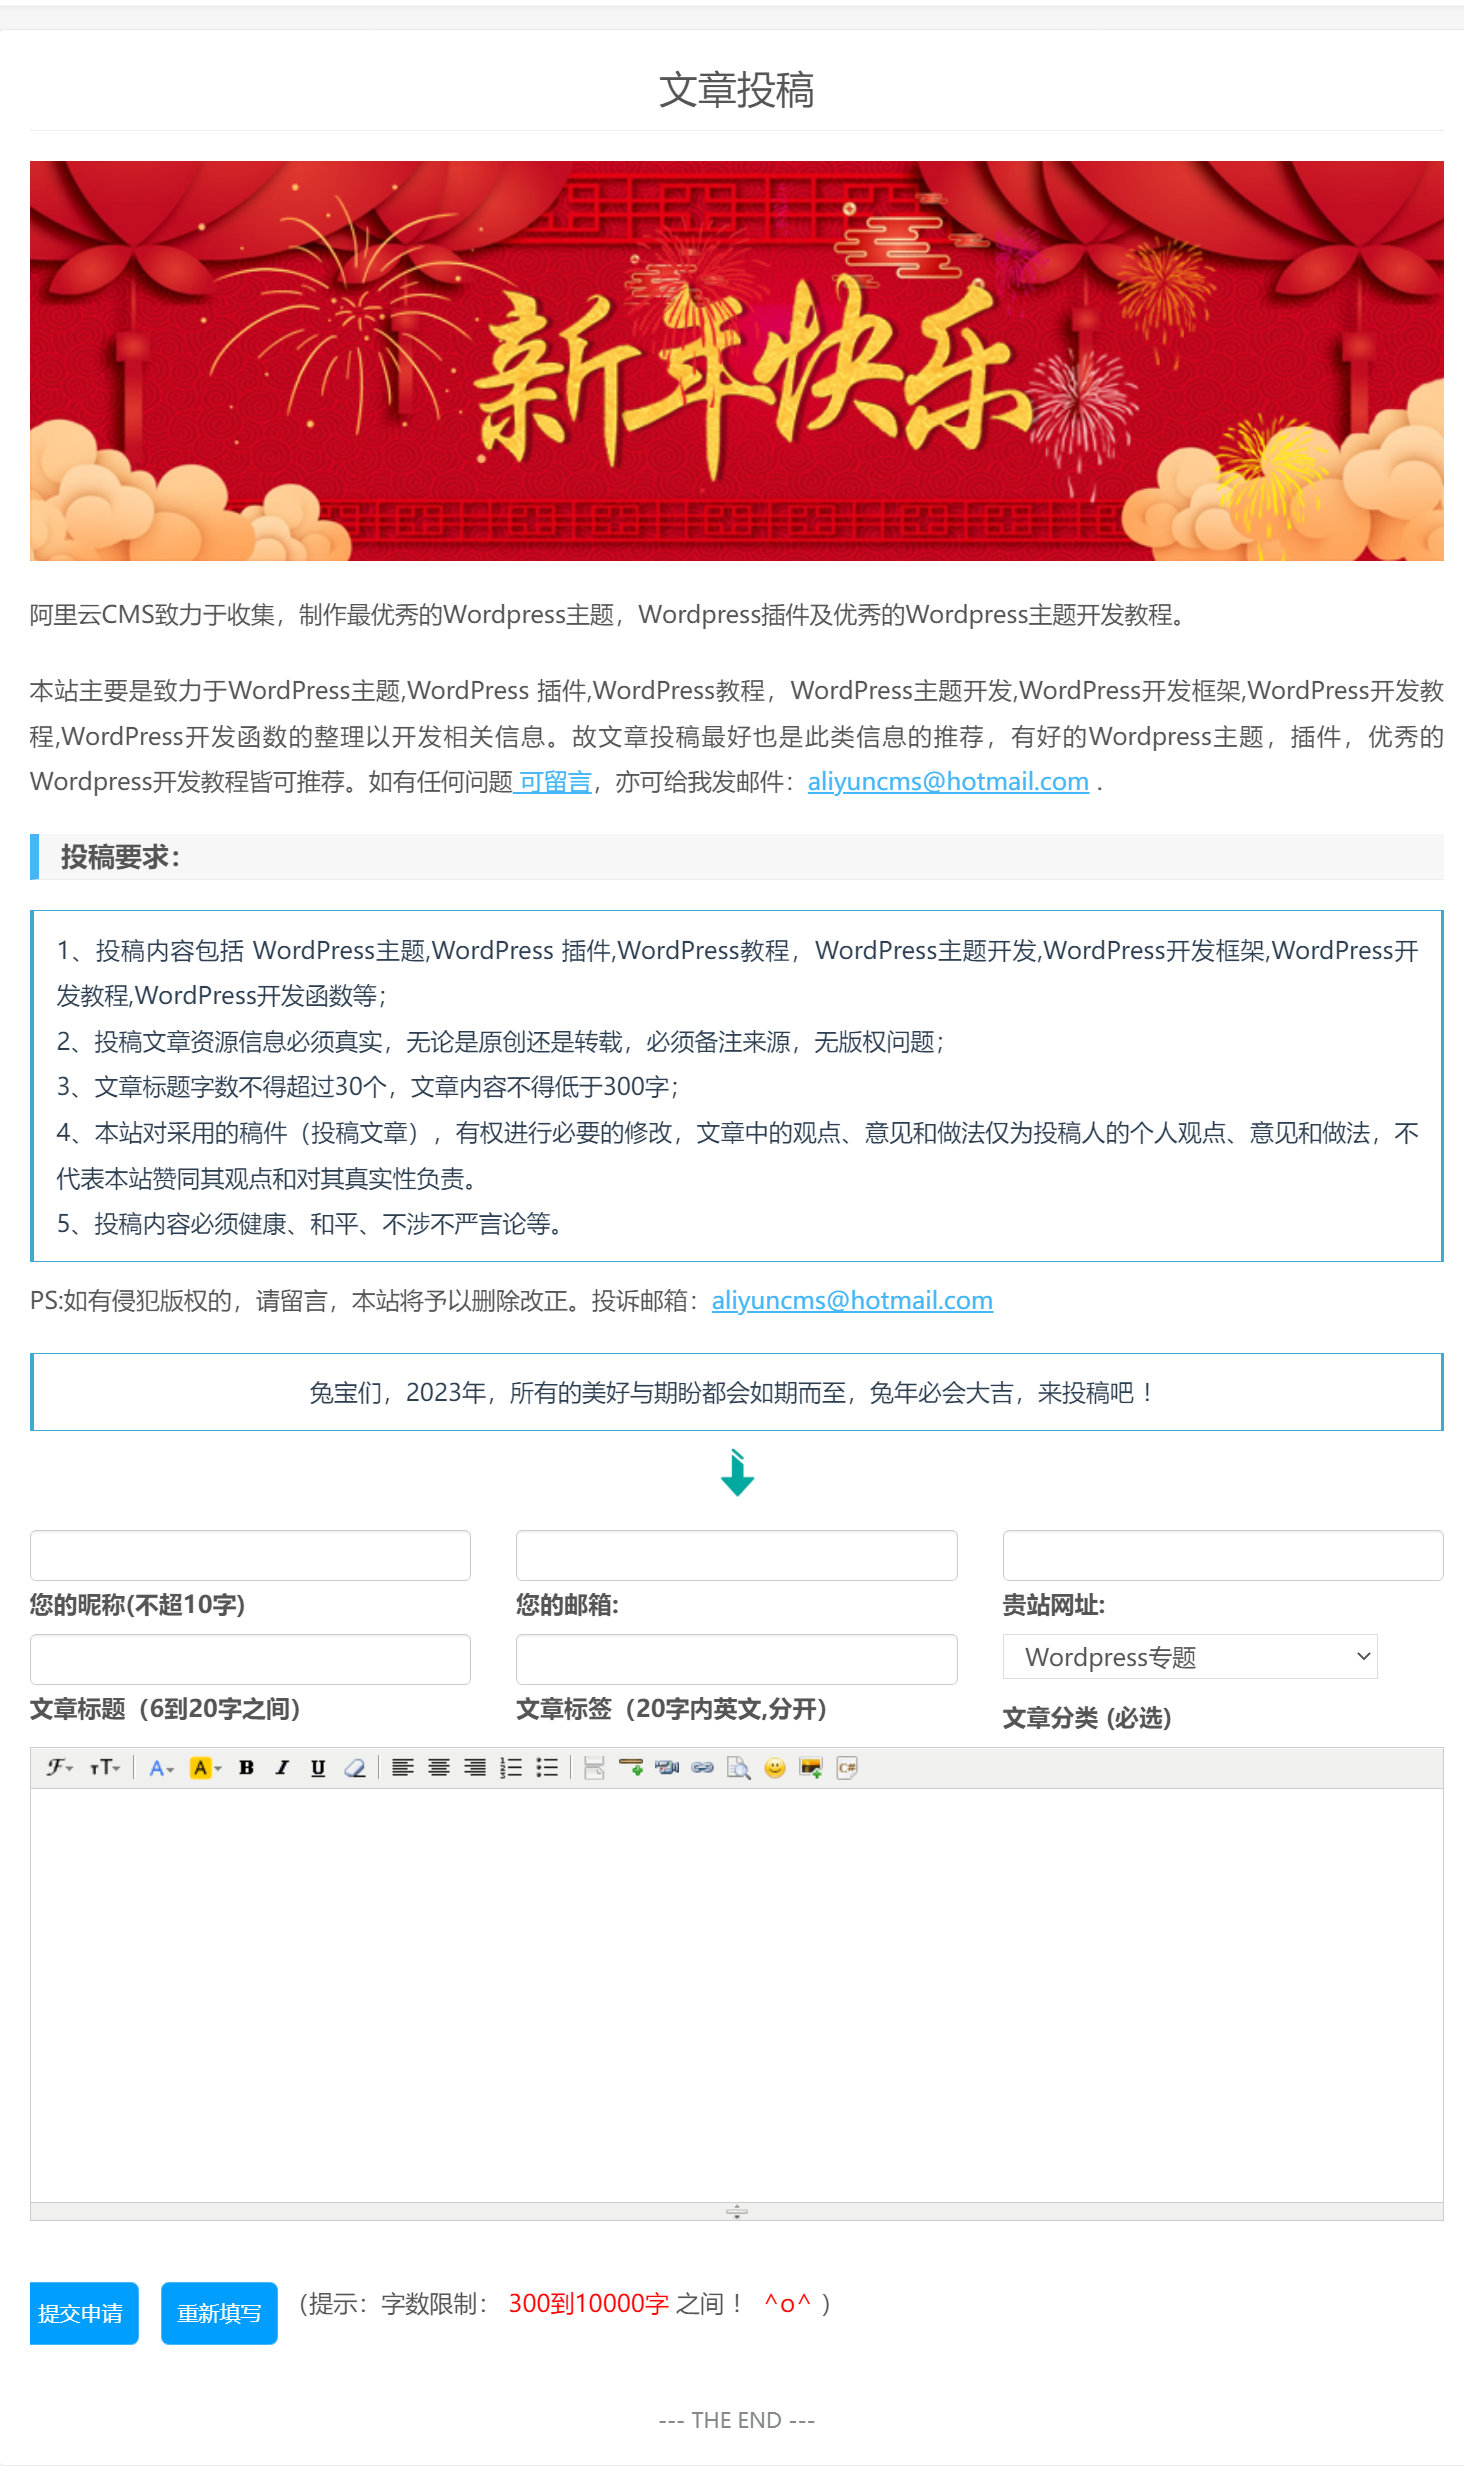
很多网站都想开放读者的投稿功能,接受读者的投稿,不仅可以丰富博客的内容,还可以增加与读者之间的沟通,可以说是一举多得的事情,何乐不为呢?WordPress本身并不提供投稿功能,但是WordPress拥有强大的扩展能力,我们可以自己来添加这个功能。效果如图:
一,新建文章投稿页面
1.在你目前使用的模板的根目录创建一个php文件,命名为 tougao.php,然后将你需要的 page.php 模板中的所有代码复制到 tougao.php 中 ;
修改 tougao.php 开头的注释,即 /* 与 */ 内的内容,修改后如下所示:
/*
 * Template name: 文章投稿
 * Description:   A tougao page
 */
二.把下面的代码甩进 functions.php:中
//投稿
if( isset($_POST['tougao_form']) && $_POST['tougao_form'] == 'send'){
    if ( isset($_COOKIE["tougao"]) && ( time() - $_COOKIE["tougao"] ) < 120 ){
        wp_die('您投稿也太勤快了吧,先歇会儿,2分钟后再来投稿吧!');
    }
    // 表单变量初始化
    $name = trim($_POST['tougao_authorname']);
    $email = trim($_POST['tougao_authoremail']);
    $site = trim($_POST['tougao_site']);
    $title = strip_tags(trim($_POST['tougao_title']));
    $category = isset( $_POST['cat'] ) ? (int)$_POST['cat'] : 0;
    $content = $_POST['tougao_content'];
    $tags = strip_tags(trim($_POST['tougao_tags']));
    if(!empty($site)){
        $author='<a href="'.$site.'" title="'.$name.'" target="_blank" rel="nofollow noopener">'.$name.'</a>';
    }else{
        $author=$name;
    }
   $info='<h2> 感谢: '.$author.' '.'投稿</h2> '.' !' ;
    global $wpdb;
    $db="SELECT post_title FROM $wpdb->posts WHERE post_title = '$title' LIMIT 1";
    if ($wpdb->get_var($db)){
        wp_die('发现重复文章.你已经发表过了.或者存在该文章');
    }
    // 表单项数据验证
    if ($name == ''){
        wp_die('昵称必须填写,且长度不得超过20个字');
    }elseif(mb_strlen($name,'UTF-8') > 20 ){
        wp_die('你的名字怎么这么长啊,起个简单易记的吧,长度不要超过20个字哟!');
    }elseif($title == ''){
        wp_die('文章标题必须填写,长度6到25个字之间');
    }elseif(mb_strlen($title,'UTF-8') > 25 ){
        wp_die('文章标题太长了,长度不得超过50个字');
    }elseif(mb_strlen($title,'UTF-8') < 6 ){
        wp_die('文章标题太短了,长度不得少于过6个字');
    }elseif ($email ==''|| !preg_match("/^([a-z0-9\+_\-]+)(\.[a-z0-9\+_\-]+)*@([a-z0-9\-]+\.)+[a-z]{2,6}$/ix", $email)){
        wp_die('Email必须填写,必须符合Email格式');
    }elseif ($content == ''){
        wp_die('内容必须填写,不要太长也不要太短,300到10000个字之间');
    }elseif (mb_strlen($content,'UTF-8') >20000){
        wp_die('你也太能写了吧,写这么多,别人看着也累呀,300到10000个字之间');
    }elseif (mb_strlen($content,'UTF-8') < 50){
        wp_die('太简单了吧,才写这么点,再加点内容吧,300到10000个字之间');
    }elseif ($tags == ''){
        wp_die('不要这么懒吗,加个标签好人别人搜到你的文章,长度在2到20个字!');
    }elseif (mb_strlen($tags,'UTF-8') < 2){
        wp_die('不要这么懒吗,加个标签好人别人搜到你的文章,长度在2到20个字!');
    }elseif (mb_strlen($tags,'UTF-8') > 40){
        wp_die('标签不用太长,长度在2到40个字就可以了!');
    }elseif ($site == ''){
        wp_die('请留下贵站名称,要不怎么宣传呀,这点很重要哦!');
    }elseif ($site == ''){
        wp_die('请填写原文链接,好让其他人浏览你的网站,这是最重要的宣传方式哦!');
    }else{
        $post_content = $info.'<br />'.$content;
        $tougao = array(
            'post_title' => $title,
            'post_content' => $post_content,
            'tags_input'  =>$tags,
            'post_status' => 'pending', //publish
            'post_category' => array($category)
        );
    // 将文章插入数据库
    $status = wp_insert_post( $tougao );
    if ($status != 0){
        setcookie("tougao", time(), time()+1);
        echo ('<div style="text-align:center;">'.'<title>'.'你好!'.'</title>'.'</div>');
        echo ('<div style="text-align:center;">'.'<meta charset="UTF-8" /><meta http-equiv="refresh" content="5;URL=https://www.xinfangs.com">'.'</div>');
        echo ('<div style="position:relative;font-size:14px;margin-top:100px;text-align:center;">'.'投稿成功,感谢投稿,5秒钟后将返回网站首页!'.'</div>');
        echo ('<div style="position:relative;font-size:20px;margin-top:30px;text-align:center;">'.'<a href="/" >'.'立即返回网站首页'.'</a>'.'</div>');
        wp_mail( array('aliyuncms@hotmail.com', $email), "您的投稿主人已经收到啦!", $info, array('Content-Type: text/html; charset=UTF-8') );
        die();
    }else{
        wp_die('投稿失败!');
    }
    }
}
3.在 tougao.php 中搜索: the_content,将其替换成 代码一
代码一:
<?php the_content(); ?>
<!--S 关于表单样式,请自行调整 S-->
     <form method="post" action="<?php echo $_SERVER["REQUEST_URI"]; $current_user =
     wp_get_current_user(); ?>" class="row">
    <div class="t1 tt col-sm-4">
    <span>
        <input class="form-control" type="text" size="40" value="<?php if ( 0 != $current_user->ID ) echo $current_user->user_login; ?>" name="tougao_authorname"; id="tougao_authorname" tabindex="1" />
    </span>
    <span>
        <label>您的昵称(不超20字)</label>
    </span>
</div>
<div class="t2 tt col-sm-4">
    <span>
     <input class="form-control" type="text" size="40" value="<?php if ( 0 != $current_user->ID ) echo $current_user->user_email; ?>" name="tougao_authoremail" id="tougao_authoremail" tabindex="2" />
    </span>
    <span>
        <label>您的邮箱:</label>
    </span>
</div>
<div class="t3 tt col-sm-4">
    <span>
        <input class="form-control" type="text" size="40" value="<?php if ( 0 != $current_user->ID ) echo $current_user->user_url; ?>" name="tougao_site" id="tougao_site" tabindex="4" />
    </span>
    <span>
        <label>贵站网址:</label>
    </span>
</div>
<div class="t4 tt col-sm-4">
    <span>
        <input class="form-control" type="text" size="40" value="" name="tougao_title" id="tougao_title" tabindex="3" />
    </span>
    <span>
        <label>文章标题(6到50字之间)</label>
    </span>
</div>
<div class="t5 tt col-sm-4">
    <span>
        <input class="form-control" type="text" size="40" value="" name="tougao_tags" id="tougao_tags" tabindex="5" />
    </span>
    <span>
        <label>文章标签(20字内英文,分开)</label>
    </span>
</div>
<div class="t6 tt col-sm-4">
    <span>
        <?php wp_dropdown_categories('show_count=0&hierarchical=1&hide_empty=0'); ?>
    </span>
    <span>
        <label>文章分类 (必选)</label>
    </span>
</div>
<div class="clear"></div>
<div id="postform">
    <textarea rows="15" cols="70"  class="form-control col-sm-12" id="tougao_content" name="tougao_content" tabindex="6" /></textarea>

</div>
</br>
     <div><input type="hidden" value="send" name="tougao_form" />
     <button type="submit" class="btn btn-danger">提交申请</button>
     <button type="reset" class="btn btn-outline-secondary">重新填写</button>
    (提示:字数限制:<font color="red"> 300到10000字 </font> 之间 !<font color="red"> ^o^ </font>)
        </div>

</form>

<!--E 关于表单样式,请自行调整 E-->
PS:这样的投稿编辑器不是很好用,我们再来给投稿功能添加富文本编辑器
二:安装富文本编辑器:
1、下载 KindEditor 富文本编辑器
这里我们将使用 KindEditor来作为我们的编辑器,点此下载 KindEditor。下载后解压,将文件夹重命名为 kindeditor,放到你当前主题文件夹下。
这里我们将使用 KindEditor来作为我们的编辑器,点此下载 KindEditor。下载后解压,将文件夹重命名为 kindeditor,放到你当前主题文件夹下。
2、在 tougao.php 中搜索 /form 或者将代码一中第41行的 /form 改成:
</form>
<script charset="utf-8" src="<?php bloginfo('template_url'); ?>/kindeditor/kindeditor-all-min.js"></script>
<script charset="utf-8" src="<?php bloginfo('template_url'); ?>/kindeditor/kindeditor-all.js"></script>
<script charset="utf-8" src="<?php bloginfo('template_url'); ?>/kindeditor/lang/zh_CN.js"></script>
<script>
/* 编辑器初始化代码 start */
	var editor;
	KindEditor.ready(function(K) {
		editor = K.create('#tougao_content', {
		resizeType : 1,
		allowPreviewEmoticons : false,
		allowImageUpload : true, /* 开启图片上传功能,不需要就将true改成false */
		items : [
			'fontname', 'fontsize', '|', 'forecolor', 'hilitecolor', 'bold', 'italic', 'underline',
			'removeformat', '|', 'justifyleft', 'justifycenter', 'justifyright', 'insertorderedlist',
			'insertunorderedlist', '|','pagebreak','hr','media', 'link', 'preview', 'emoticons', 'image' ,'code']
		});
	});
/* 编辑器初始化代码 end */
</script>
<script src="<?php bloginfo('template_url'); ?>/kindeditor/prism/prism.js"></script>
<link rel="stylesheet" href="<?php bloginfo('template_url'); ?>/kindeditor/prism.css">
<script charset="utf-8" src="../kindeditor-all-min.js"></script>
<script charset="utf-8" src="../lang/zh_CN.js"></script>
<script>
	... 编辑器初始化代码
</script>
3.如果感觉 样比较复杂也可以用 WordPress 自带的 tinymce编辑器 ,可以在 /form 后下加上如下代码:
<script type="text/javascript" src="<?php echo home_url(); ?>/wp-includes/js/tinymce/tinymce.min.js"></script>
<script type="text/javascript">
  tinymce.init({
    selector : '#tougao_content',
    menubar: false,
    //toolbar: false,
});
</script>
最后再把下面的 css 甩在 style.css中即可。
/***************投稿**************/
.form{padding:0 20px;}
.form div.tt{float:left;width:460px;margin:10px 0;}
.form input,.t6 #cat{width:250px;height:30px;padding:0 10px;}
#submit_post{margin:20px 0;}
#submit_post input{width:150px;height:50px;}
#postform{width:100%;padding:0 15px;}
#tougao_content{
    width: 100%;
}